One of the intermittent problems we face when developing with OI 10 is knowing about the new properties and features that we now have access to. The pace of development is so rapid that the documentation just doesn't keep up. There's a fine source of documentation at revDevX.com along with multiple blog posts at the same site but sometimes the Lord helps those who help themselves.
With this in mind, we'll use a real world example to illustrate how much easier life can be when we have access to such new features.
We recently wanted to have a radio button contract or expand based upon a control record. We knew how we would have accomplished this in the past - we'd grab the button control object, destroy it, modify it then recreate it. That's all well and good, it works and the control stays at the right place in the tab order - but it can change the Z-Order of the control which isn't always desirable.
Naturally we wondered if there was a better way in 10.
Of course there is, or we wouldn't be making this blog post.
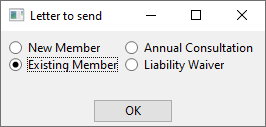
Taking a simple example where we want to alter the available buttons based on the membership type, we'd have one set of radio buttons for the member type and another for the letter type.
An existing member wouldn't need a Welcome Letter so clicking on "Existing Member" has to do this
i.e. the "Welcome Letter" option is removed.
We all like to boast that OpenInsight is written in OpenInsight but the implications of this can be missed in the excitement of the new environment. We're so used to OI not exposing all of a control's properties that we lose track of the possibility that what we need may be staring us right in the face.
The simple fact is, that if something exists in the property panel in the form designer for a control, then it is an exposed property. So let's look at the property panel for a radio button.
and what do we see as the fourth property? Buttons.
Clicking on the options button displays a dialog containing the text and values for the radio button :-
As we've telegraphed this far in advance you can probably guess what this means - radio buttons expose a BUTTONS property. It consists of two columns, both multivalued. The first is the label description and the second is the associated code.So now, to accomplish the above goal all we have to do is manipulate this property. Here's a simple code snippet to do this :-
If you're not familiar with the syntax being used for getting and setting properties check out the blog post here.
| Making Databases Happen |
UK +44 (0) 20 8912 1010 USA +1 267 238 3814 |


